Selection Options
After you have chosen one of the Selection Tools, PixelNEO's Option Panel will change to include settings to modify how those tools work.
![]()
The Option Panel as it appears when one of the Selection Tools is active.
![]()
When the Magic Wand or Color Selection Tools are active, the Option Panel also contains a control for Color Tolerance.
The Transparency button allows you to specify which parts of the selection area should appear transparent or hollow (allowing an original portion of the original picture underneath to show through). After making a selection, click this button to display the Define Transparency screen.
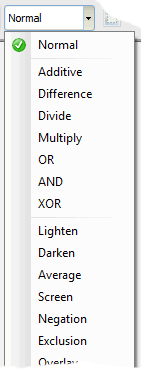
The Paint Mode option allows you to change the method PixelNEO uses to paint the selected area onto the picture. For most applications, you will leave this setting on Normal, but you can create some interesting special effects by experimenting with the other modes.

Use the selection background option to determine whether the area underneath the selection should be erased or left intact.
![]() You must set the background option before creating a selection.
You must set the background option before creating a selection.
Use the Create Mask from Selection button ![]() to create a Mask from the current selection. Like painter's masking tape, a masked area will protect a picture from unwanted paint and other modifications. Only the areas lying outside the mask can be edited. Once enabled, a mask will remain in effect until removed using the Remove/Clear Mask button
to create a Mask from the current selection. Like painter's masking tape, a masked area will protect a picture from unwanted paint and other modifications. Only the areas lying outside the mask can be edited. Once enabled, a mask will remain in effect until removed using the Remove/Clear Mask button ![]() or the picture is closed.
or the picture is closed.
Additional Mask options can be found in the Edit menu.
Use the Edge Feather slider to subtly blend the edges of selected area with the background. Setting the slider to zero will turn this feature off.
Use the Opacity slider to adjust the transparency of the selection. 255 = solid/opaque, 0 = completely invisible/transparent.
When the Magic Wand or Color Selection Tools are active you can use the Color Tolerance slider to broaden the scope of the colors included within the selection. A setting of zero will select only those pixels that exactly match the color that you clicked. Higher settings will expand the selection to include additional pixels with colors that fall within the tolerance range.
![]() You must set the color tolerance before creating a selection.
You must set the color tolerance before creating a selection.
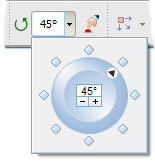
This control can be used to rotate the selection to a precise angle. To restore the selection's original orientation, set the rotation angle to zero.
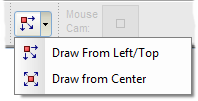
Rectangles and ellipses are normally drawn from a corner and dragged to the opposite corner to produce a shape of the desired size. Instead, you can select the Draw from Center option ![]() to start in the center and drag to an outside edge to create these shapes.
to start in the center and drag to an outside edge to create these shapes.
The MouseCam displays a magnified portion of your picture as it might appear from the point of view of the mouse cursor. The rectangle in the center of the box represents the pixel at the actual cursor position. You can use the MouseCam to help make precise selections.