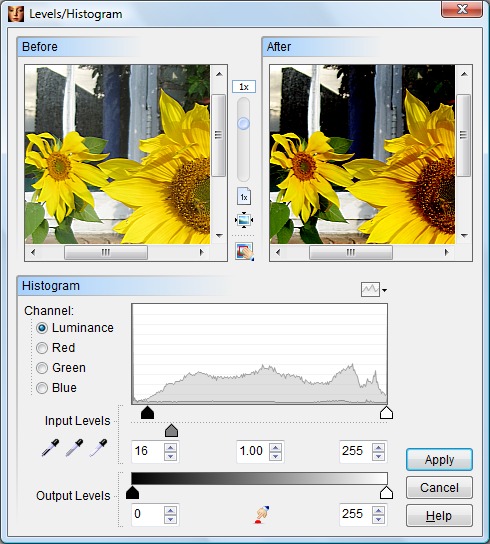
Levels/Histogram
The Levels/Histogram command can be used to make very precise adjustments to a picture's overall brightness, contrast, and tonal range. This can be helpful in correcting photographs that are either underexposed (too dark) and overexposed (too light).
For more information about a specific item, click the image above.
The original picture and the effects of your changes are shown in the Before and After preview windows. Drag the vertical slider to adjust the magnification level of the preview images. Click the ![]() button to shrink the preview images so that they fit completely within the preview window, or click the
button to shrink the preview images so that they fit completely within the preview window, or click the ![]() button to display the preview image actual size (1:1). If needed, you may move the preview to display a different portion of the picture using the scroll bars or by dragging its center with the mouse. The
button to display the preview image actual size (1:1). If needed, you may move the preview to display a different portion of the picture using the scroll bars or by dragging its center with the mouse. The ![]() button can be used to quickly zero in on a specific area of the picture.
button can be used to quickly zero in on a specific area of the picture.
Select the color channel you wish to adjust. For the majority of images, the Luminance channel (a composite of all three RGB channels) will produce the best results. However, it can sometimes be helpful to make adjustments to an individual color channel. For example, you could use the Red channel option to adjust a picture that contained too much or too little red.
A histogram is a graphical representation of the brightness or tonal distribution of a picture. The horizontal axis of the histogram represents a range of brightness values from pure black (on the left) to medium grey (the middle) to pure white (on the right). The vertical axis represents the number of pixels that fall into each of these areas. For example, a histogram of a predominantly dark picture will have more data points on the left side of the chart, while a predominantly white picture will have most of its data points on the right.
![]() Digital colors are defined by their Red, Green and Blue (RGB) components. Every color that can be displayed on a computer screen is composed of specific quantities of red, green and blue light. By specifying levels (from 0 to 255) of these three elements, you can create any one of the 16 million colors in the computer's palette. These RGB values are used to calculate the picture's histogram.
Digital colors are defined by their Red, Green and Blue (RGB) components. Every color that can be displayed on a computer screen is composed of specific quantities of red, green and blue light. By specifying levels (from 0 to 255) of these three elements, you can create any one of the 16 million colors in the computer's palette. These RGB values are used to calculate the picture's histogram.
You can change the appearance of the histogram by clicking on the ![]() button. Select Show Before Histogram to display only the original unmodified (before) picture's histogram. Select Show After Histogram to display only the histogram of the modified (after) picture. Select Show Composite Histogram to display both before and after histograms superimposed on top of each other.
button. Select Show Before Histogram to display only the original unmodified (before) picture's histogram. Select Show After Histogram to display only the histogram of the modified (after) picture. Select Show Composite Histogram to display both before and after histograms superimposed on top of each other.
![]() Every picture's histogram is unique, so the adjustments required for one photo will not be the same as those required for another.
Every picture's histogram is unique, so the adjustments required for one photo will not be the same as those required for another.
A perfectly exposed picture will include a full range of shades from dark to light. Ideally, the picture's brightest pixels should be pure white and the darkest pixels should be pure black. Pictures that do not use the entire tonal range usually appear flat, muddy or washed out. A picture's tonal range can be extended by adjusting the black ![]() ,midtone
,midtone ![]() and white
and white ![]() input level sliders.
input level sliders.
Move the midtone slider to darken or lighten the picture's middle tones (the ones between pure black and pure white). This will pull details out of the shadows. Move the black slider to the right to make the dark portions of the picture darker. The white slider can be moved to the left to make the light portions of the picture lighter.
The dropper tools ![]() can be used to select the black, midtone and white input levels directly from the picture itself. This method is more crude than using the sliders, but can be useful when you need to make quick corrections. The dropper tools affect the Red, Green and Blue channels only. The luminance channel is not affected by the dropper tools.
can be used to select the black, midtone and white input levels directly from the picture itself. This method is more crude than using the sliders, but can be useful when you need to make quick corrections. The dropper tools affect the Red, Green and Blue channels only. The luminance channel is not affected by the dropper tools.
The Output Level sliders allow you to shorten the tonal range by clipping the picture's dark and light colors. This will increase the picture's contrast. The black slider ![]() controls the lower limit of the tonal range. For example, if you set the black slider to 25, then no pixel in the picture will be darker than 25. The white slider
controls the lower limit of the tonal range. For example, if you set the black slider to 25, then no pixel in the picture will be darker than 25. The white slider ![]() controls upper limit of the tonal range. For example, if you set the white slider to 245, then no pixel in the picture will be lighter than 245.
controls upper limit of the tonal range. For example, if you set the white slider to 245, then no pixel in the picture will be lighter than 245.
The Reset button ![]() can be used to restore the picture and the sliders to their original states.
can be used to restore the picture and the sliders to their original states.
When you are satisfied with your settings, click the Apply button to modify your picture or selection.