The Print command allows you to output the active picture to your printer. PixelNEO provides numerous options to control how your picture will appear when printed.
For more information about a specific item, click the image above.
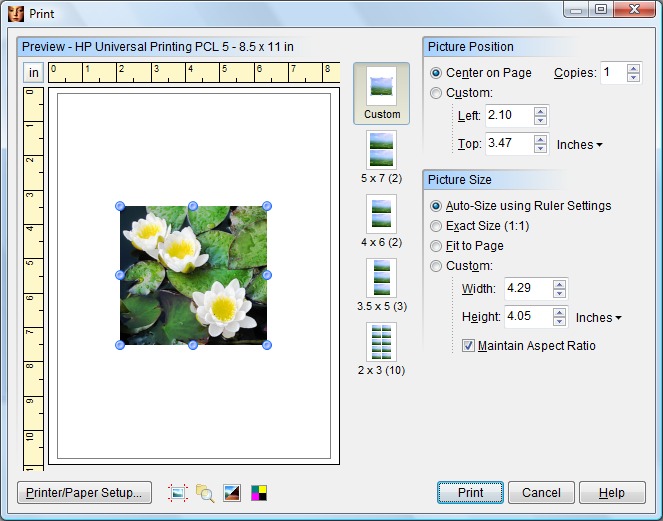
This shows approximately how your picture will appear on paper when printed. Rulers along the left and top are provided to help you place and size your picture on the page.
You can move your picture to a different location on the page by positioning the mouse cursor in the center of the picture thumbnail image. The mouse cursor will change to an open hand. Hold down the left mouse button and drag the picture to a new location. You can change the position of your picture with more precision using the Picture Position controls.
You can change the printed size of your picture by using the mouse to drag the handles (which look like this ![]() ), surrounding the perimeter of the thumbnail. When your mouse is properly positioned over one of these handles, the mouse cursor will change to a pointing hand. Press down on the left mouse button and drag the handle to a new position. As you move a handle, the picture preview will stretch or shrink. You also can change the picture's size using the Picture Size controls.
), surrounding the perimeter of the thumbnail. When your mouse is properly positioned over one of these handles, the mouse cursor will change to a pointing hand. Press down on the left mouse button and drag the handle to a new position. As you move a handle, the picture preview will stretch or shrink. You also can change the picture's size using the Picture Size controls.
![]() You must have the Custom option selected in order to use the size and positioning features.
You must have the Custom option selected in order to use the size and positioning features.
Click the ![]() button in the upper left corner of the Preview area to change the unit of measurement used by the rulers and other controls. You can choose pixels, inches, centimeters or points.
button in the upper left corner of the Preview area to change the unit of measurement used by the rulers and other controls. You can choose pixels, inches, centimeters or points.
The layout options determine how many copies of the picture will be printed per page. If you select an option other than Custom, you must also set the number of Copies if you want to print more than one copy of the picture.
These controls allow you to precisely adjust the placement of your picture on the page. Select the Center on Page option to automatically center your picture on the paper or select the Custom option to enter exact coordinates.
These controls allow you to precisely set the width and height of your picture on the page.
The Auto Size using Ruler Settings option will calculate the printout size using your picture's resolution/dpi (dots per inch) and the dpi of the selected printer. If your picture contains a valid dpi setting, then this option can be used to insure that your printout closely matches what you see on the screen. If the picture's dpi setting is not valid, then using this option can result in a print out that is either too small, too large or distorted.
The Exact Size (1:1) option simply maps the picture pixel for pixel to the selected printer without regard for dpi settings. This can be useful when printing pictures that need to be output at an exact 1:1 ratio. However, when printing small pictures on a high resolution (300+ dpi) printer, this will result in an extremely small image.
Using the Fit to Page option will stretch the picture to the maximum printable area of the selected paper type. This works well for most high resolution images. Stretching low resolution, less detailed images can result in some degradation of the image.
The Custom option allows you to enter arbitrary width and height settings to precisely control the size of your printed picture. Select the Maintain Aspect Ratio option to size the picture without distorting it.
![]() Changing a picture's size and position here does not affect the actual contents of the picture, only how it is printed.
Changing a picture's size and position here does not affect the actual contents of the picture, only how it is printed.
Enter the number of copies (1-99) you would like printed.
Click the Printer/Paper Setup button to change the size and orientation of the paper, change printer specific settings or to select a different printer.
Enabling the ![]() button will add crop and registration marks to your printout. These are helpful for trimming a finished project or lining up color separations.
button will add crop and registration marks to your printout. These are helpful for trimming a finished project or lining up color separations.
When the ![]() button is pressed, PixelNEO will add the picture's file name and today's date to your printout.
button is pressed, PixelNEO will add the picture's file name and today's date to your printout.
Selecting the ![]() button will print a reverse image (negative) of your picture.
button will print a reverse image (negative) of your picture.
The ![]() button will print your picture as a CMYK color separation. It will print four separate images one for each primary printing color - Cyan, Magenta, Yellow and Black. Also, be sure to select the crop/registration marks button so that your separations can be lined up easily. This is only useful if you are sending your image to a professional print shop.
button will print your picture as a CMYK color separation. It will print four separate images one for each primary printing color - Cyan, Magenta, Yellow and Black. Also, be sure to select the crop/registration marks button so that your separations can be lined up easily. This is only useful if you are sending your image to a professional print shop.
Once you have finished configuring the settings for your picture, click the Print button in the lower-right corner to begin printing. The Cancel button returns you to PixelNEO without printing.